You are surely aware of the fact that securing desktop PCs and laptops can be a challenging task. With IoT devices the problem is up the scale for a magnitude or two. When you have dozens or even hundreds of cheap IoT devices flying around in areas where usually access control is difficult to realize security is a must-have feature.
A typical IoT device exposure:
- wifi access credentials
- IoT cloud credentials
- alterations of software and / or device
General measures:
- run your IoT devices on a separate wifi access point which has no connection to your house-network. With that it becomes impossible to access other resources on your network once your device and / or wifi credentials have been compromised
- you need to make sure your devices have only minimum access rights for what they need (i.e. send measurements, download firmware updates)
Security activities on the device itself are twofold:
- Secure Boot
- Flash Encryption
Flash encryption goes hand in hand with secure boot. Also you could use either feature without the other - we use them together to secure our devices.
Be warned that you potentially can render your esp32 chip unusable if you do not know what you doing. Please make sure that you have read and understand the relevant documentation and follow the instructions.
Secure Boot
By securing the boot process we want to make sure that the device boots only our firmware and nothing else. With that we prevent an attacker to run his own firmware on the device. To understand secure boot we first need to get an idea on how the boot process works on the esp32.
esp32 boot process overview:
- run 1st stage bootloader from ROM
- load 2nd stage bootloader into RAM from flash
- load partition table and main app from flash
- execute main app (2nd CPU and FreeRTOS scheduler starts)
The secure boot feature comprises of:
- burn efuse to enforce secure boot (you can not turn off secure boot after that)
- store secure bootloader key in efuse
- sign images and partition table during build process
- disable JTAG and ROM Basic Interpreter
- you can also disable reflashing of the bootloader
- chip will only boot signed bootloaders (mechanism completely in hardware)
Process:
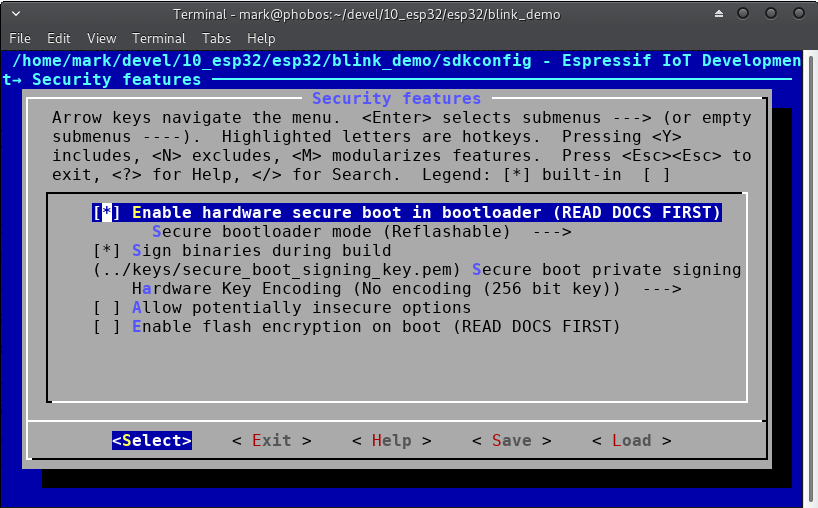
- use ESP-IDF’s “make menuconfig” to configure “Security Features”
Create the signing key:
$ openssl ecparam -name prime256v1 -genkey -noout -out secure_boot_signing_key.pemThe above command writes “secure_boot_signing_key.pem”. Keep this key at a safe place and do not loose it! Otherwise you can not build new firmware for your secured esp32 devices.
Flash Encryption
With flash encryption we want to achieve that somebody who gained physical access to one of our IoT devices can not read the data, program code or credentials that are stored on it.
With flash encryption the following flash data gets encrypted:
- bootloader
- secure boot loader digest
- partition table
- all app partitions
Note that the NVS partition remains unencrypted!
The esp32 has a mechanism to encrypt the partitions itself during the first boot but the devices efuse wears out (you can do initial flashing only 4 times / obviously this count does not include ota updates and firmware binaries signed during build). We do NOT use this - I mention it so you understand and avoid using it. Otherwise you might eventually render your esp32 unusable.
If you configure “Security Features” then by default, “Sign binaries during build” is enabled. With that your “Secure boot private signing key” (we created one above) is used to sign your firmware images when you build it.
I made the following screenshot so you can easily find the options referenced in the text above:
Save the configuration and you are all set. If you build and flash your application your firmware binary gets automatically signed and verified.
$ make bootloader

$ make flash monitor
Well, I must say securing esp32 is as easy as it could be. Well done espressif!
I hope this post is helpful to you.
All the best, Mark